
You can find my all .Net core posts here.
In my previous post on the CLI tools, I explained how to create, restore, clean, build, run .Net Core application using latest CLI commands. You can find the post here.
In this post, we will see how to create and publish Nuget packages using CLI commands.
What is a Nuget package?
MS official NuGet document sums up the importance of Nuget as follows:
An essential tool for any modern development platform is a mechanism through which developers can create, share, and consume useful code. Often such code is bundled into “packages” that contain compiled code (as DLLs) along with other content needed in the projects that consume these packages.
For .NET (including .NET Core), the Microsoft-supported mechanism for sharing code is NuGet, which defines how packages for .NET are created, hosted, and consumed, and provides the tools for each of those roles.
Put simply, a NuGet package is a single ZIP file with the
.nupkgextension that contains compiled code (DLLs), other files related to that code, and a descriptive manifest that includes information like the package’s version number.
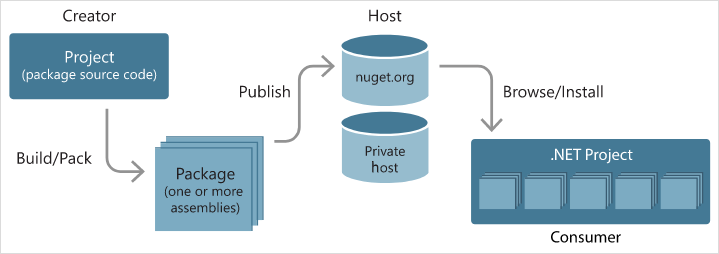
As you can see in above image, we can build\pack whole project into a Nuget Package and we can then publish this Nuget package to either Nuget.org or any other private host. Once published, we can use this package within .Net projects or we can even install\deploy this package to any server.
As a developer you should be familiar with the Nuget packages because they are really important part of our .Net projects.
For this post, we will use the same application which we created in Part I post here.
Nuspec files
Nuspec files are very important for Nuget packages.
Nuget packages requires manifest which describes the package dependencies and the content, this manifest is nothing but the .nuspec file.
As per Microsoft site:
A .nuspec file is an XML manifest that contains package metadata. This manifest is used both to build the package and to provide information to consumers. The manifest is always included in a package.
It is a good practice to create a Nuspec file in which you mention all the dependencies and the details of package by your own, else the system will generate the nuspec file when we run the pack command.
If you do not wish to create nuspec file, it is better to add at least some details in your csproj file, which will be used to generate the nuspec file. Add below properties in the csproj file:
<PackageId>SampleCliApp</PackageId>
<Version>1.0.0</Version>
<Authors>Neel</Authors>
<Company>CompanyX</Company>
You can add the same details from Visual Studio 2017. For this Right click project -> Click Properties -> Open Package tab and fill the details:

More details here for Nuspec: https://docs.microsoft.com/en-us/nuget/reference/nuspec
Create Nuget packages
Web applications are not packable by default. To change this, modify your csproj file to include this property:
<IsPackable>true</IsPackable>
Once the property is added, run below command to create Nuget package:
dotnet pack
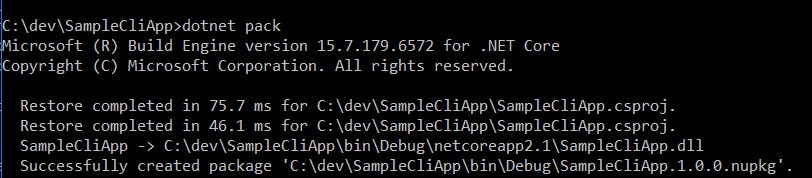
Nuget package would be created on the location: bin\debug\
Check here if you want to see different options within dotnet pack command.
Publish package
As we have just created the Nuget package, we need some space to store our packages.
Nuget.org provides that space where you can store your Nuget packages but they are public so other developers can also see your packages. If you do not wish to use Nuget.org then there are other options like:
- Visual Studio Team Services Package Management, which is also available on Team Foundation Server 2017 and later.
- MyGet
- ProGet from Inedo
- NuGet Server, a community project from Inedo
- NuGet Server (Open Source), an open-source implementation similar to Inedo’s NuGet Server
- Artifactory from JFrog
- Nexus from Sonatype
- TeamCity from JetBrains
More details here: https://docs.microsoft.com/en-us/nuget/hosting-packages/overview
For this post, we will publish the package to the Nuget.org
Publish to Nuget.org
We can publish our packages to the Nuget.org once we have the API keys. Let us go step by step to get the key and then to publish the packages using that key.
To publish the packages to Nuget.org, we need to create an account in the Nuget.org here: https://www.nuget.org/users/account/LogOn?returnUrl=%2F
Once the account is created, click on your account name -> Click on API keys:

Create new API key:

Once the keys are created, note down the key:

Important Note: Note that you can not copy this key later on because you will be required to create new keys for the second time, so save the keys at the time of creation.
Once we have the key, we can use dotnet nuget push command as below:
dotnet nuget push SampleCliApp.1.0.0.nupkg -k yourApiKey -s https://api.nuget.org/v3/index.json

Here -k stands for API keys and -s stands for source, in our case it is Nuget.org so we provided the path accordingly.
As you can see in the logs, packages are pushed to the Nuget.org.
Let us go back to Nuget.org to check our packages, the packages would be there:

You can Update\Delete the packages.
Have a look here if you want to see different options for dotnet nuget push.
Browse our Nuget package
Once we have punished our package to Nuget.org, we should be able to browse this package from the Visual Studio.
Open Visual Studio -> Manage Nuget package -> Search for your package, in my case SampleCliApp:

Package is available as you can see above 🙂
In future posts, I will explain how to use the CLI commands to create CI(Continuous integration).
You can find my all .Net core posts here.
Hope it helps.

One thought on “Guide to Create and Publish Nuget packages using .Net Core CLI: .Net Core CLI Part II”