
Introduction
Dependency Injection (DI) is a pattern that can help developers decouple the different pieces of their applications. DI provides a mechanism for the construction of dependency graphs independent of the class definitions.
NET Core supports the DI software design pattern, which is a technique for achieving Inversion of Control (IoC, the “D” on the SOLID principles) between classes and their dependencies.
Prior to .NET Core, the only way to get DI in your applications was by using frameworks such as Autofac, Ninject, StructureMap and many others. However, DI is treated as a first-class citizen in ASP.NET Core.
The Problem
The Dependency Inversion Principle states that:
- High-level modules should not depend on low-level modules. Both should depend on abstractions
- Abstractions should not depend on details. Details should depend on abstractions
To better understand the above statements, you should probably ask yourself:
- Have you ever had to change a lot of code because of a new simple requirement?
- Have you ever had a hard time trying to refactor a part of your application?
- Have you ever been in trouble writing unit tests because of components that required other components?
If you answered yes to any of these questions, maybe your codebase suffers from dependency. It’s a typical disease of the code of an application when its components are too coupled. In other words when a component depends on another one in a too-tight way. The main effect of component dependency is the maintenance difficulty of the code, which, of course, implies a higher cost.
Take a look at the following code:
| class Bar : IBar { | |
| // ... | |
| }class Foo { | |
| private readonly IBar _bar; | |
| public Foo(IBar bar) { | |
| _bar = bar; | |
| } | |
| } |
In this example, Foo depends on IBar and somewhere you’ll have to construct an instance of Foo and specify that it depends on the implementation Bar like so:
| var bar = new Bar(); | |
| var foo = new Foo(bar); |
There are a couple of problems with this. Firstly, it violates the Dependency Inversion Principle because the consuming class implicitly depends on the concrete types Bar and Foo. Secondly, it results in a scattered definition of the dependency graph and can make unit testing very difficult (because Foo and Bar can’t be mocked).
The Composition Root pattern states that the entire dependency graph should be composed in a single location “as close as possible to the application’s entry point” (your Startup class on ASP.NET Core and your Program class on .Net Core).
Our Solution
The .NET Core built-in DI provides an IoC mechanism, often referred to as a “Container”, for offloading the instantiation, injection, and lifetime management of the application’s dependencies. You invert the control of component instantiation from the consumers to the container, hence “Inversion of Control”.
To do this, you simply register services within the container, and then you can load the top-level service. The framework will inject all child services for you.
The solution will be further introduced with code examples.
Key Concepts
- Dependency Inversion Principle: It’s a software design principle. It suggests a solution to the dependency problem but does not say how to implement it or which technique to use
- Inversion of Control (IoC): This is a way to apply the Dependency Inversion Principle. IoC is the actual mechanism that allows your higher-level components to depend on abstraction rather than the concrete implementation of lower-level components. IoC is also known as the Hollywood Principle. This name comes from the Hollywood cinema industry, where, after an audition for an actor role, usually the director says, don’t call us, we’ll call you
- Dependency Injection: This is a design pattern to implement the IoC. It allows you to inject the concrete implementation of a low-level component into a high-level component
- IoC Container: Also known as DI Container, it’s a programming framework that provides you with an automatic DI of your components
Dependency Injection approaches
- Constructor Injection: One of the most popular DI technics. With this approach, you create an instance of your dependency and pass it as an argument to the constructor of the dependent class
- Method Injection: In this case, you create an instance of your dependency and pass it to a specific method of the dependent class
- Property Injection: This approach allows you to assign the instance of your dependency to a specific property of the dependent class
Service Lifetimes
Sometimes you might need a single instance of our dependency that will live for the entire lifetime of your application. This may be suitable for a service like a logger or a helper, but it’s unacceptable for other services. The IoC Container allows you to control the lifetime of a registered service. When you register a service specifying a lifetime, the container will automatically dispose of it accordingly. There are three service lifetimes:
- Singleton: This lifetime creates one instance of the service. The service instance may be created at the registration time by using the Add()/AddSingleton() method
- Transient: By using this lifetime, your service will be created each time it will be requested. This means, for example, that a service injected in the constructor of a class will last as long as that class instance exists. To create a service with the transient lifetime, you have to use the AddTransient() method
- Scoped: The scoped lifetime allows you to create an instance of a service for each client request. This is particularly useful in the ASP.NET context since it allows you to share the same service instance for the duration of an HTTP request processing. To enable the scoped lifetime, you need to use the AddScoped() method
Let’s get to work
Of course, all of this may seem too abstract. Well, this article will provide you with code examples to clarify the concepts about dependency and the techniques to mitigate it. While the general concepts are valid for any programming language and framework, this article will focus on the .NET Core framework and will illustrate the infrastructure it provides you to help in reducing component dependency.
In order to keep this article relatively short we will mainly focus on one of the most popular DI technics: “constructor injection”. We will start by the DI implementation on an ASP.NET Core MVC application due to its simplicity to illustrate the services’ lifetimes.
You can either follow all of the steps below or simply download the project here.
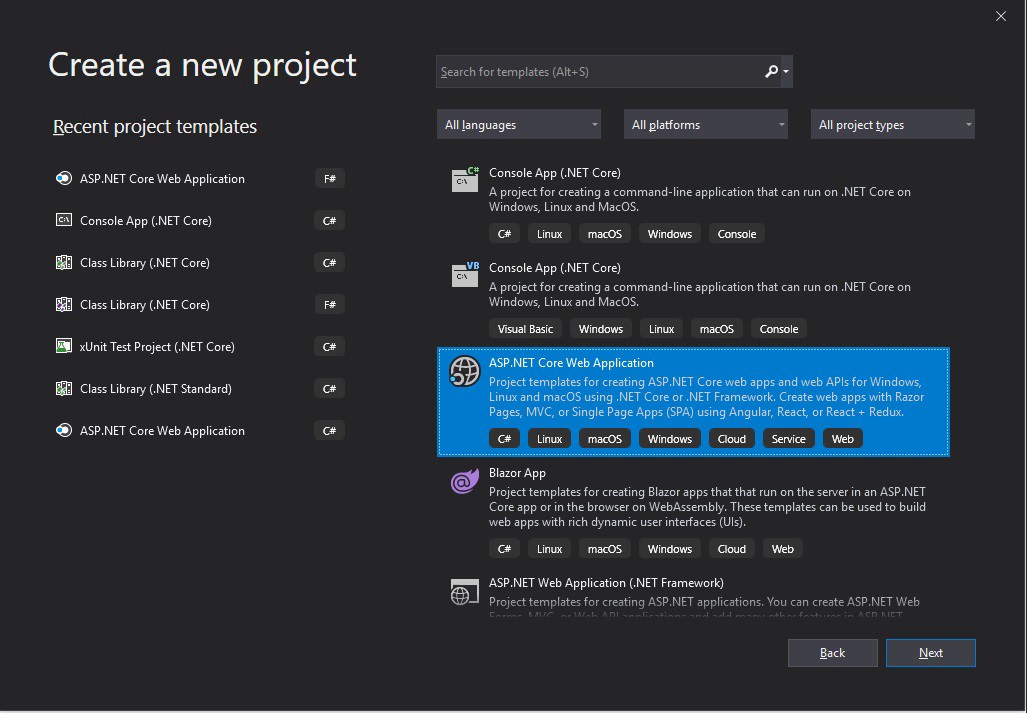
Create a new ASP.NET Core Web Application
Set the solution’s name and physical path

Choose a Web Application MVC project

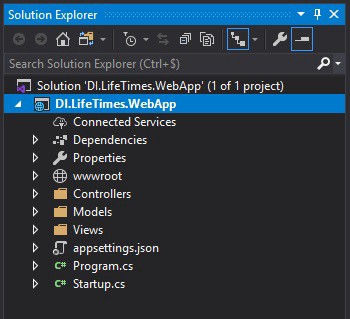
Project’s initial state
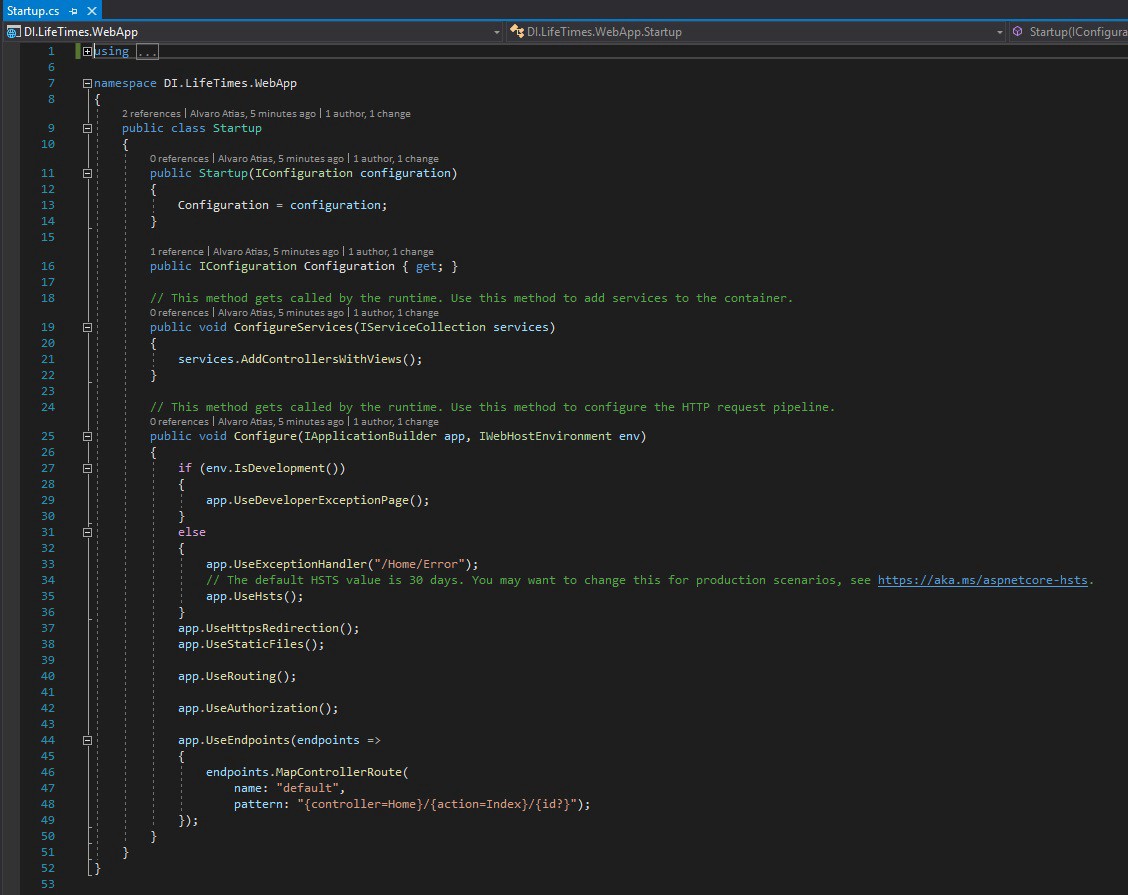
Take a look at Startup
Add a “Services” folder in the project’s root

Create Services and Interfaces
Create the following files in the Services folder: The IOperation works just as a contract that stipulates that whoever implements it should mandatorily have a Guid “Id” property with a getter. The “Operation” classes do all the same thing, when created they set an “Id” property.
- IOperation:
| public interface IOperation | |
| { | |
| Guid Id { get; } | |
| } |
- SingletonOperation:
| public interface ISingletonOperation : IOperation | |
| { | |
| } | |
| public class SingletonOperation : ISingletonOperation | |
| { | |
| public Guid Id { get; } | |
| public SingletonOperation() | |
| { | |
| Id = Guid.NewGuid(); | |
| } | |
| } |
- TransientOperation:
| public interface ITransientOperation : IOperation | |
| { | |
| } | |
| public class TransientOperation : ITransientOperation | |
| { | |
| public Guid Id { get; } | |
| public TransientOperation() | |
| { | |
| Id = Guid.NewGuid(); | |
| } | |
| } |
- ScopedOperation:
| public interface IScopedOperation : IOperation | |
| { | |
| } | |
| public class ScopedOperation : IScopedOperation | |
| { | |
| public Guid Id { get; } | |
| public ScopedOperation() | |
| { | |
| Id = Guid.NewGuid(); | |
| } | |
| } |
- MyService: This service will be injected into the HomeController. It will help us obtain a new instance of every service with only one call from the HomeController constructor
| public interface IMyService | |
| { | |
| } | |
| public class MyService : IMyService | |
| { | |
| private readonly ISingletonOperation _singletonOperation; | |
| private readonly ITransientOperation _transientOperation; | |
| private readonly IScopedOperation _scopedOperation; | |
| public MyService | |
| ( | |
| ISingletonOperation singletonOperation, | |
| ITransientOperation transientOperation, | |
| IScopedOperation scopedOperation | |
| ) | |
| { | |
| _singletonOperation = singletonOperation; | |
| _transientOperation = transientOperation; | |
| _scopedOperation = scopedOperation; | |
| } | |
| } |
Take a first look at your HomeController
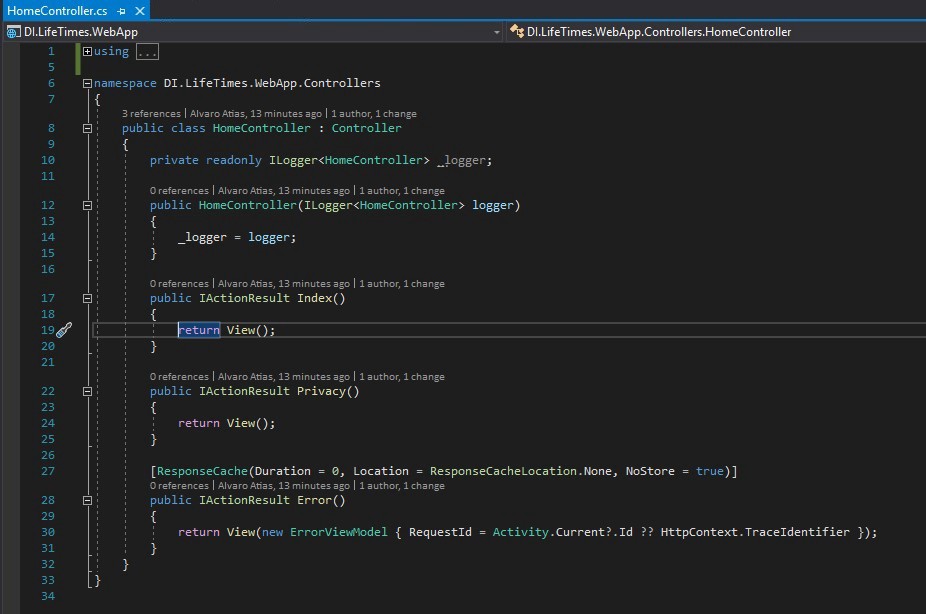
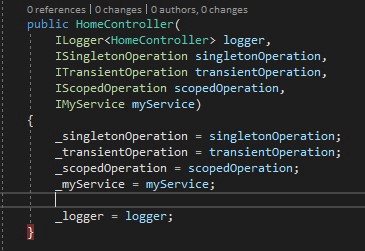
So now you will continue to modify the HomeController adding three new properties and injecting the dependencies via constructor injection as it follows:
| private readonly ISingletonOperation _singletonOperation; | |
| private readonly IScopedOperation _scopedOperation; | |
| private readonly ITransientOperation _transientOperation; | |
| private readonly IMyService _myService; | |
| private readonly ILogger<HomeController> _logger; | |
| public HomeController | |
| ( | |
| ILogger<HomeController> logger, | |
| ISingletonOperation singletonOperation, | |
| ITransientOperation transientOperation, | |
| IScopedOperation scopedOperation, | |
| IMyService myService | |
| ) | |
| { | |
| _singletonOperation = singletonOperation; | |
| _transientOperation = transientOperation; | |
| _scopedOperation = scopedOperation; | |
| _myService = myService; | |
| _logger = logger; | |
| } |
You don’t have to worry about the methods in the HomeControlleryou won’t be working with them.
You can now launch the web application by pressing F5 or the execute button on Visual Studio.
You surely got the following error message:

The error means that the application tried to resolve the ISingletonOperation parameter in the HomeControllerconstructor but wasn’t able to do so.
Final touches
So, this code example has covered so far working with abstractions instead of concrete classes and constructor injection, but you haven’t yet configured your DI Container/IC Container!
That’s right, that’s what’s still missing and that’s why the application doesn’t work… yet.
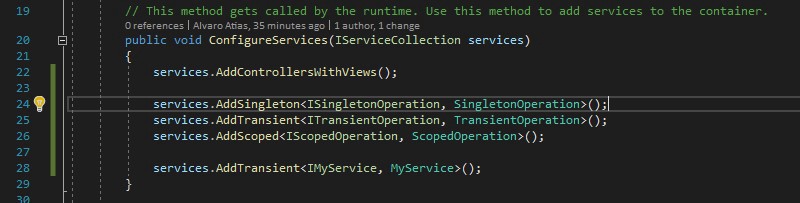
So, in order to fix this, you should add the following four lines into the ConfigureServices method in Startup:
| services.AddSingleton<ISingletonOperation, SingletonOperation>(); | |
| services.AddTransient<ITransientOperation, TransientOperation>(); | |
| services.AddScoped<IScopedOperation, ScopedOperation>(); | |
| services.AddTransient<IMyService, MyService>(); |
Right now, you should have something looking a little bit like this:
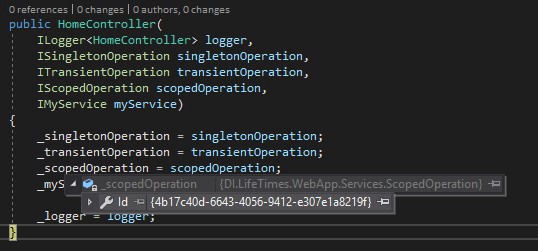
Before you relaunch the web application just set a breakpoint at the end of HomeController’s constructor:
You can now launch!
To summarize…
So, what’s the point of everything you’ve done so far?
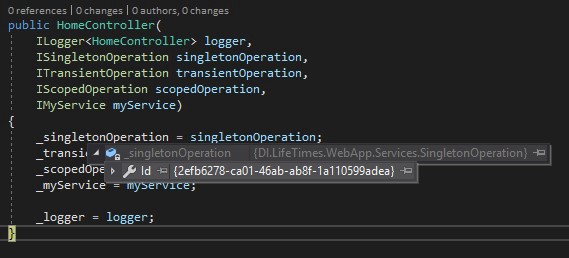
Before we check every object in the constructor you should remember each of the DI lifetime’s definition and try and apply it for this example.
- _singletonOperation: Once you’ve launched the web application its value will be always the same
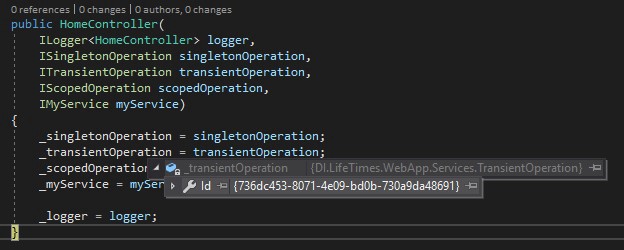
- _transientOperation: Its value will change every time the TransientOperation service is called
- _scopedOperation: It’s value will change for every new request to the server (so in your case by just refreshing the web site’s home page)
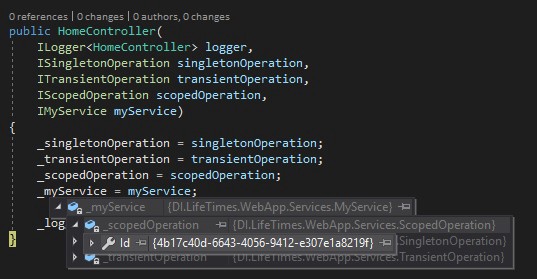
As you read before on this article, _myService is just used to rapidly obtain new instances of the three different services in the application.
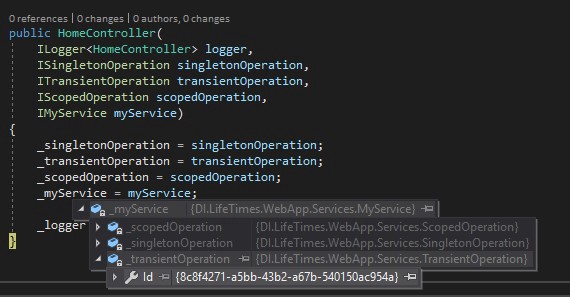
- _myService: Logically if you did things right _myService should have the same values as _singletonOperation and _scopedOperation, but it should have a different value for _transientOperation.

Congratulations! You’ve done great!
This proves everything is working just as expected.
To finally check the other lifetimes, you should press F5 on Visual Studio to continue the current server request execution and then refresh the site’s home page on your web browser. This will launch a new request to the server.
On this second server request, the values for _singletonOperation and _myService._singletonOperation should be the same as for the first server request.
_scopedOperation and _myService._scopedOperation should have the same value but it should be different compared to its value from the first server request.
_transientOperation and _myService._transientOperation should have different values and these values should be yet different from those of the first server request.
Link to the original article: https://medium.com/net-core-dependency-injection/asp-net-core-dependency-injection-3aa993c2b583

The article is great. Your way of approach will help .Net developers. Really impressed with your work, keep up the good work.
Thanks for sharing.
LikeLike
Thanks man! I really appreciate it 🙂
LikeLike