- How to register an app with Azure Active Directory?
- How to get the access token using Azure Active Directory authentication?
- How to register a bot application with Azure Bot Service?
- How to user Bot State Service to save user conversation state data such as access token?
Prerequisites
- To use popular Azure Services free for 12 months, read Create your Azure free account.
- To be ready with Bot Framework Dev Environment, refer to Quick start – Development Of Chat Bot Using Microsoft Bot Framework – For Beginners.
You can pull the code from GitHub.
Initial Setup
Step 1 Register an app with Azure Active Directory
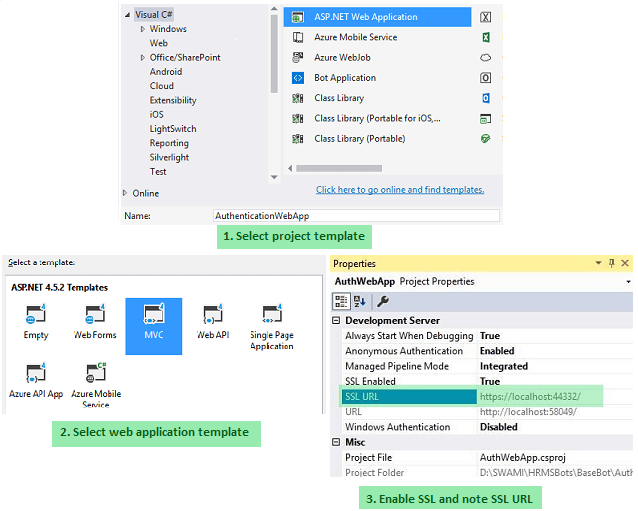
Before going to the Azure portal, let’s create a web application for managing tokens post authentication process. Create a new project in Visual Studio with ASP .NET Web Application project template. In the next step, select MVC as a web app template.
Select web application project and press F4. It will display Properties window. Change the “SSL Enabled” property to true. Make note of SSL URL; it will be required while registering the app. It will be used while registering an app.
Go to Azure Portal and login to your account. It will open your dashboard and on the left-hand side menu bar, there is the Azure Active Directory option. Click on that option. It will open the tool pane for Active Directory configurations.
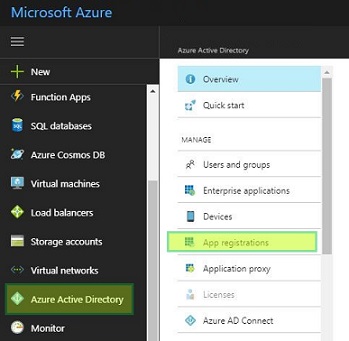
Click on “App Registrations” menu link. It will list down all the applications which are registered previously with Azure Active Directory. You can search for apps by ID or the name of the app.
Now, click on the app. It will redirect you to the Settings page of the app. Note down the Application ID. Click on Required Permissions menu link and grant permissions to provide access to Azure Active Directory. To see what all permissions are granted, you can click on Permissions and it will open the list. Now, go to Keys menu and add a new key as ClientSecret which will be used while calling the token endpoint for requesting the access token.
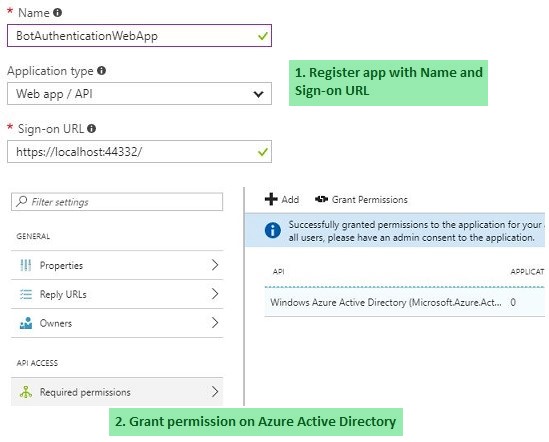
Now, we are ready with app registration and permission.
Step 2 Update web application to handle pre and post authentication functionality
@{
ViewBag.Title = "Login Success";
}</pre>
<div class="jumbotron">Login successful! Continue with chat..</div>
<pre>
public ActionResult LoginWithAzure(string channelId, string userId)
{
/// Save Channel Id and User Id to session
Session["channelId"] = channelId;
Session["userId"] = userId;

string tenantId = "8c3dad1d-xxxx-4f8b-xxxx-8263372eced6";
string clientId = "5e9569bf-xxxx-418d-xxxx-fd33a25b9267";

string redirect_uri = $"https://localhost:44332/HOME/LoggedinToAzureAD";

string url = $"https://login.microsoftonline.com/{tenantId}/oauth2/authorize?client_id={clientId}&response_type=code&redirect_uri={redirect_uri}";

/// Redirect to login page
return Redirect(url);
}
public ActionResult LoggedinToAzureAD()
{
string authorizationcode = Convert.ToString(this.Request.QueryString["code"]);

string tenantId = "8c3dad1d-xxxx-xxxx-xxxx-xxxxxxxxxxxx";
string clientId = "xxxxxxxx-54cd-xxxx-942e-b38145646559";
string clientSecret = "3VRAK0EetjxxxxxxxxxxxxxxxxxqURLMzY60lM=";
string appresourceId = "https://graph.windows.net/";
string redirect_uri = "https://localhost:44332/HOME/LoggedinToAzureAD";

//Build the URI
var builder = new UriBuilder($"https://login.microsoftonline.com/{tenantId}/oauth2/token");

NameValueCollection postBody = new NameValueCollection(){
{ "client_id", $"{clientId}" }, { "client_secret", $"{clientSecret}" },
{ "grant_type", "authorization_code" }, { "code", $"{authorizationcode}" },
{ "redirect_uri", $"{redirect_uri}"}, { "resource", $"{appresourceId}" }
};

//Send the POST request
using (WebClient client = new WebClient())
{
var responseString = System.Text.Encoding.UTF8.GetString(client.UploadValues(builder.Uri, postBody));
JObject json = JObject.Parse(responseString);
string accessToken = Convert.ToString(json["access_token"]);
StateClient stateClient = new StateClient(new MicrosoftAppCredentials("bot application id", "bot app password"));
BotData userData = stateClient.BotState.GetUserData(Convert.ToString(Session["channelId"]), Convert.ToString(Session["userId"]));
userData.SetProperty("AccessToken", accessToken);
stateClient.BotState.SetUserData(Convert.ToString(Session["channelId"]), Convert.ToString(Session["userId"]), userData);
}
return View();
}
As we have mentioned the URL of LoggedinToAzure view as redirect URI, after login, Azure will redirect the user to LoggedinToAzure view with the authorization code as a query string parameter.
We will call the token endpoint to get the access token by sending client id, client secret, and resource as Graph API resource URL. We will make POST call to token endpoint using WebClient. It will return an access token.
We will save this access token to the Bot State Service for the selected channel and user id. To access the Bot State Service, we will use the app id and app password which we get while registering a bot application.

One thought on “ChatBot With Azure Authentication – Part One”