
Note – You can find the source code of my sample application here.
In my previous series of post, I explained the Create, Read, Update, Delete(CRUD) using Angular 5 with .Net Core 2 API. For Part I(Database first set up in .Net Core 2) is here and Part II(CRUD in Angular 4) is here.
In this post, we will see how to do Code first in .Net Core 2.
Let us start.
prerequisite:
- Visual studio 2017 community edition, download here
- .Net Core 2.0 SDK from here (I have written a post to install SDK here)
Create the Web application using .Net Core 2.0 template in VS 2017
Once you have all these installed, open your Visual Studio 2017 -> Create New Project -> Select Core Web application:

Click on Ok and in next window, select Web Application as shown below:

Visual Studio will create a well-structured application for you:

Here we have different razor pages and individual classes(.cs) for all those Razor pages.
Let us concentrate on Code First approach.
Install Entity Framework Core
Next step is to install Microsoft.EntityFrameworkCore.SqlServer(Microsoft SQL Server database provider for Entity Framework Core) which will help us to go further with Entity Framework operations.
Open Package Manager Console and run below command:
Install-Package Microsoft.EntityFrameworkCore.SqlServer
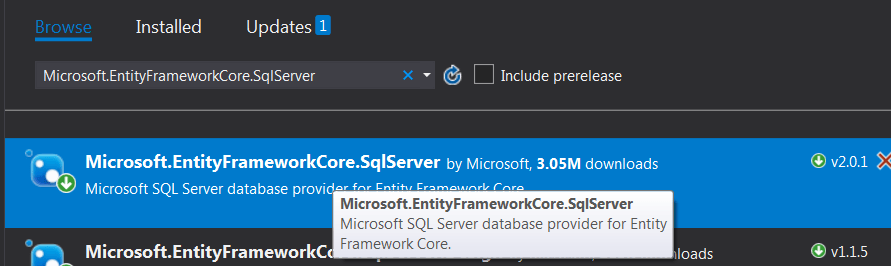
OR Search with Microsoft.EntityFrameworkCore.SqlServer in Nuget Package Manager and click on Install:
To make sure whether the package has been installed in the application or not, you can check it under Nuget folder as below:

Next step is to install Microsoft.EntityFrameworkCore.Tools because we will be using some Entity Framework Core Tools to create a database from your EF Core model.
For that, Search with Microsoft.EntityFrameworkCore.Tools in Nuget Package Manager and click on Install OR Open Package Manager Console and run below command:
Install-Package Microsoft.EntityFrameworkCore.Tools
Once the package is installed, we need to add one more package which is Microsoft.VisualStudio.Web.CodeGeneration.Design because we will be using some .NET Core Scaffolding tools to create controllers and views.
For that, Search with Microsoft.VisualStudio.Web.CodeGeneration.Design in Nuget Package Manager and click on Install OR Open Package Manager Console and run below command:
Install-Package Microsoft.VisualStudio.Web.CodeGeneration.Design
All required packages are now installed:

Create EmployeeContext
Next step is to create Models folder in the application and under the Models folder, add Model.cs class as below:

In the Model.cs class, replace the code with below code:
using Microsoft.EntityFrameworkCore;

namespace NeelCodeFirstDemo.Models
{
public class EmployeeContext : DbContext
{
public EmployeeContext(DbContextOptions<EmployeeContext> options)
: base(options)
{ }

public DbSet<Employee> Employees { get; set; }
public DbSet<Department> Departments { get; set; }
}

public class Department
{
public int DepartmentId { get; set; }
public string DepartmentName { get; set; }
}

public class Employee
{
public int EmployeeId { get; set; }
public string EmployeeName { get; set; }
public int EmployeeAge { get; set; }

public int DepartmentId { get; set; }
public Department Department { get; set; }
}
}
Here we have added EmployeeContext class in which there are 2 DBSet, One is Employee and another is Department
Note: As we are having only 2 classes, we are putting it in the same file but ideally all the classes should be separated.
Add Context to Startup.cs class
Next step is to add DB Context to the Startup.cs class.
Add below references into the Startup.cs class:
using NeelCodeFirstDemo.Models;
using Microsoft.EntityFrameworkCore;
Add below lines into the ConfigureService method:
var connection = @"Server=.\SQL2012;Database=CodeFirstCodeDb;Trusted_Connection=True;ConnectRetryCount=0";
services.AddDbContext<EmployeeContext>(options => options.UseSqlServer(connection));
Add connection string of your Database and give the name of your database as shown above.
That is it, we are now ready to create the Database.
Create the Database from the code
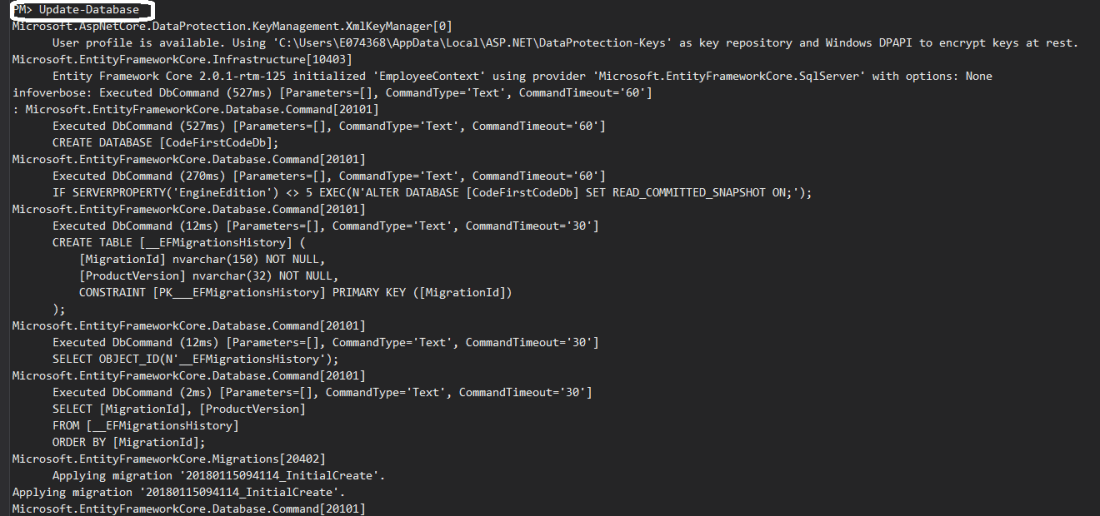
.Net Team has made this step easier and now we just need to run below line in Package Manager Console(This will create the initial set of tables for our model):
Add-Migration InitialCreate
As shown below:

Once the process is completed, run below command which will create the database before applying migrations:
Update-Database
As shown below:
Once the process is completed, let us open the SQL and see whether the Database is created or not:
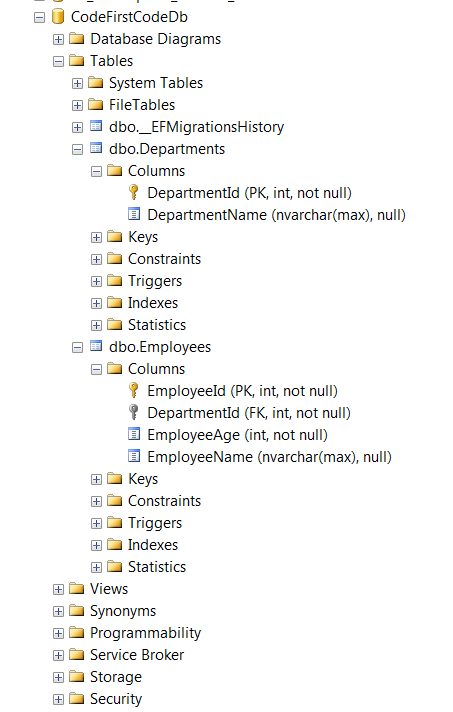
Voila, The Database is created with all the models we mentioned in the code.
Add Controller with Views, using Entity Framework
Add Controllers and Views folder under the application.
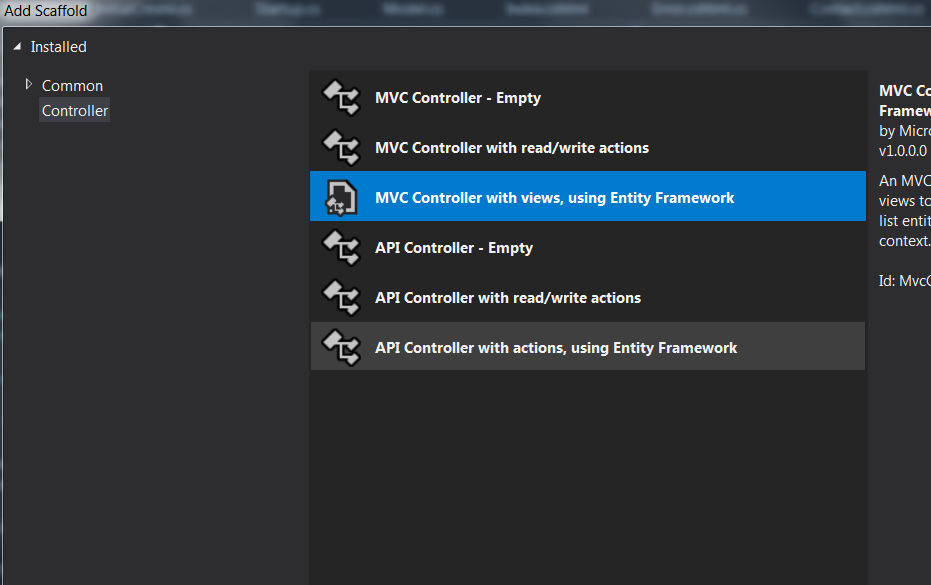
Right click on Controllers folder -> Add new Controller -> select Add Controller with Views, using Entity Framework:
In next window, select Employees in Model drop-down and EmployeeContext in Data context drop-down:
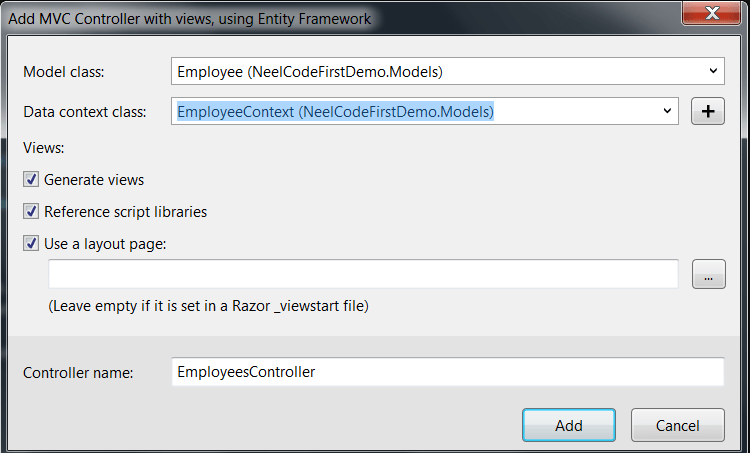
This will create EmployeeController class and all required views for CRUD operation as below:

Run the application
Run the application and navigate to /Employees
Note that upon running, you may not see the link in Create New as below:
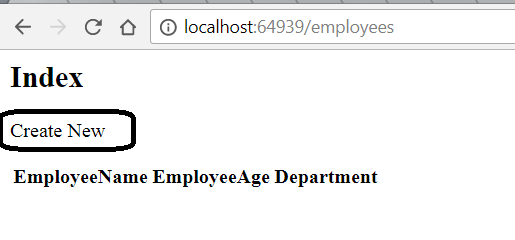
It is because asp-controller and asp-action attributes are called anchor tag helpers, and are part of the Microsoft.AspNetCore.Mvc.TagHelpers namespace which are by default not added into the views.
Add below line in all the views:
@addTagHelper *, Microsoft.AspNetCore.Mvc.TagHelpers
As below:

Add the same line to all the views.
Once you add TagHelpers reference, Links will appear and you can easily add new Employee:
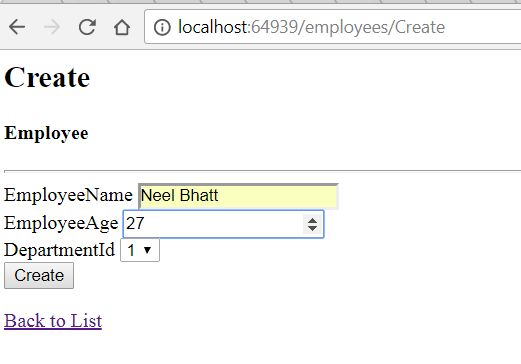
The employee will be added:

And same can be seen in the Database:

Similarly, you can do Edit, Delete, View etc.
Note – You can find the source code of my sample application here.
Hope it helps.

Great Keep it up!
LikeLike
Thanks buddy 🙂
LikeLike
Neel
Thank you so much for this. Can you tell me how to ensure that when the app opens it does so with the Index view of Employees open?
Kind regards
Jim
LikeLike
Thanks to my father who told me on the topic of this weblog, this blog is
really remarkable.
LikeLike