
In this article, I will explain how to do all Git operations from SourceTree which will be reflected in BitBucket.
Let us see what is BitBucket:
Bitbucket is a web-based hosting service that is owned by Atlassian. It is the Git solution for professional teams. Bitbucket core features include pull requests, branch permissions, and inline comments.
What is SourceTree?
Sourcetree simplifies how you interact with your Git repositories so you can focus on coding. Visualize and manage your repositories through Sourcetree’s simple Git GUI.
Below are the steps for different Git operations which are done in SourceTree.
- Create repository in BitBucket by clicking on + icon
- Give name of the repository along with the project name and then click on Create repository

Clone Repository
- Once the repository is created, you can get the URL of the repo which can be used to communicate from commands or SourceTree

- We can clone this repo by providing the URL into the SourceTree. It will then get the remote repository into our local folders:

Git bash command:
git clone https://NeelAtlas@bitbucket.org/everestatlas/repositorydemo.git C:\Users\E074368\Documents\repositorydemo
Push Changes
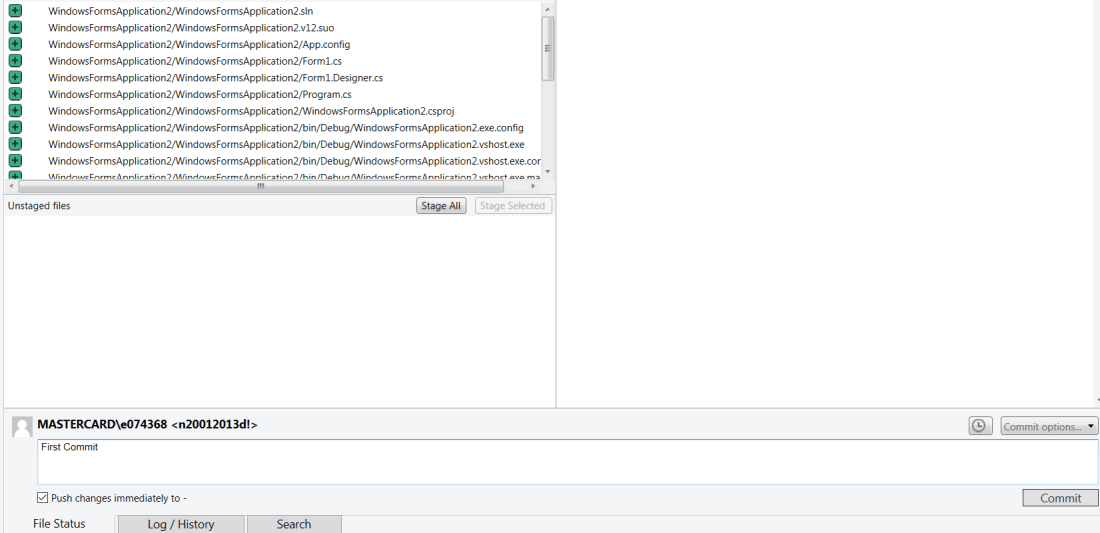
- Place the project you want to push into the folder where the repository is cloned. As soon as you put the project into the folder, SourceTree will pick the changes into its UI:

- Click on Stage All and then click on Commit, Check Push Changes immediately It will commit and push the changes to the remote repository:
GitBash commands:
git commit -m
git push origin master
- It should now be available on BitBucket under Source tab
Pull commands
- Create a sample file in BitBucket to check the Pull command. Once the file is added in BitBucket, click on Pull which will pull all latest changes from BitBucket into your local folder

Git Commands:
git fetch origin
git pull origin master
Branch Creation
- Click on Branch button in SourceTree and give appropriate name:

Git Commands:
git branch DemoRepositoryBranch1
git checkout DemoRepositoryBranch1
- Branch has been created and checked out. Go to the physical folder where actual code is stored and make changes in any file
- As soon as the changes are made in the file, it would be reflected in SourceTree as below:

- Stage All and then Commit + Push as we did earlier
- To merge the chages from branch into master, we first need to check out the master branch. For that just double click on master branch and then click on merge
Git commands:
git checkout master
- Select the changeset you want to merge and also check the checkboxes as shown below:

Git command:
Git merge DemoRepositoryBranch1
- Once the branch is merged it will show a couple of changes needs to be pushed:

- Push the changes as we did earlier. It will push master changes into the remote repository
- In BitBucket, you can now see the changes made in branch would be merged into the main master branch
Delete branch
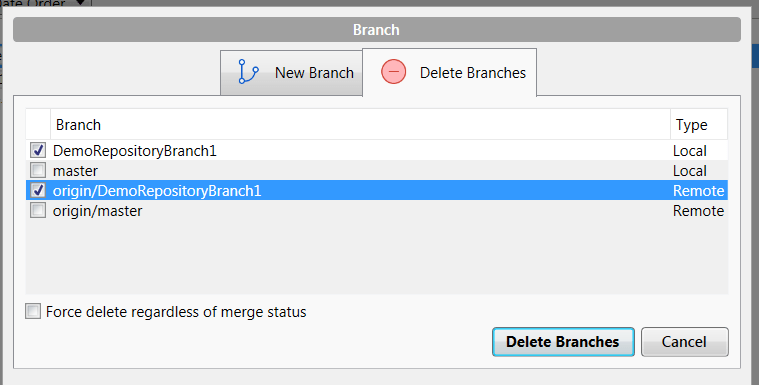
- Click on Branches tab and then click on Delete Branches, delete for local and remote both:
Git Commands:
git branch -d DemoRepositoryBranch1
git branch -d -r origin/DemoRepositoryBranch1
git push origin :refs/heads/DemoRepositoryBranch1
Rebase branch
- Rebase is somewhat similar to merge but in rebase, all the changes will be ignored from master branch which is made after the branch is created. Have a look here for more information.
- Create a new branch and repeat the steps we did above, just do not merge this time. We will do rebase instead of merge
- First, check out master branch by double-clicking on master and then Right click on the branch and select the option as shown below:

- Once the rebase is done, there will be an item added into push. Click on push to push the changes into remote repository
Git Commands:
git rebase DemoRepositoryBranch2
Rollback
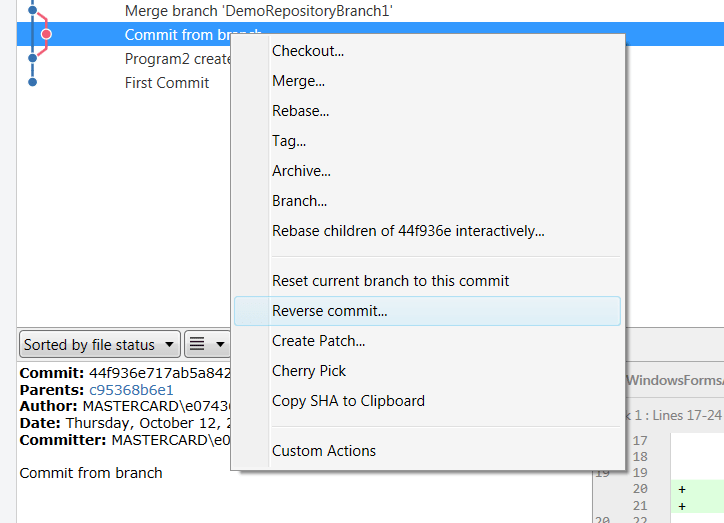
- In SourceTree, right click on the commit you want to roll back and then click on revert commit:
It will rollback the changes from that commit but make sure that you do not have any uncommitted changes while you do rollback
Git Commands:
git revert commitId
Hope it helps.
