
In my previous post, I have mentioned how to create Serverless .Net Core application which you can find here and you can find my all .Net Core posts here.
In this post, I will explain how to host\deploy your .Net Core 2.0 application to IIS.
prerequisite:
- Visual studio 2017 community edition, download here
- .Net Core 2.0 SDK from here (I have written a post to install SDK here)
- Make sure you have enabled the Web Server (IIS) role and established the role services
Install .NET Core Windows Server Hosting Bundle
Since .Net Core is a new framework, at this moment IIS is not aware of how to run .Net Core applications. So we need to inform IIS to set up an environment for the .Net Core applications.
For this, we need to install .Net Core Windows Server Hosting bundle which will install the .NET Core runtime, libraries, and the ASP.NET Core module for IIS.
Please note that this is a very important step and you must install the bundle before you publish the application on IIS.
You can download it from here(download will start once you click the link):
.NET Core Windows Server Hosting bundle
Wait till the installation is over:

Once the installation is completed, either restart your system or run below commands in sequence in command prompt:
- net stop was /y
- net start w3svc
The first command will stop the World Wide Web publishing service and the second command will start the service again.
Create the Web application using .Net Core 2.0 template in VS 2017
Once you have all these installed, open your Visual Studio 2017 -> Create New Project -> Select Core Web application:

Click on Web Application in next window and then click on Ok:

Visual Studio will create a well-structured application for you.
Right click on the solution and click on Publish:

In next window, click on Folders and give the folder path. I created Publish folder under wwwroot folder:

It will publish the application on the above-mentioned path:

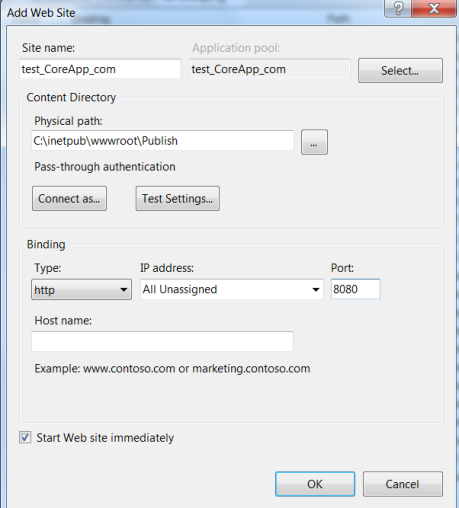
Create Website on IIS
Open your IIS Manager and add new website:
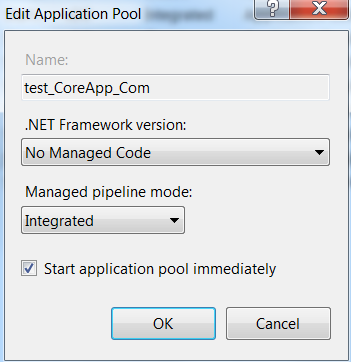
Now go to Application Pools panel, open the Edit Application Pool window by right-clicking on the website’s app pool and selecting Basic Settings and set .NET CLR version to No Managed Code:
Check if .Net Core Windows Server Hosting bundle is installed properly
Next step is to check whether the hosting bundle which we installed earlier is installed properly or not.
For this click on Modules(in IIS Manager) of your newly created website and search for AspNetCoreModule. If it is available, it indicates that IIS is now aware of how to run a .Net Core application.

You might be wondering what is Asp .Net Core Module?
- ASP.NET Core Module lets you run ASP.NET Core applications on IIS for what it’s good for i.e. security, manageability, and lots more
- On the other hand, ASP.NET Core Module lets you run ASP.NET Core applications using Kestrel for what it’s good at for example being really fast
- Thus it is getting the benefits of both technologies at once
- Asp .Net Core Module handles all incoming traffic to IIS and acts as the reverse proxy that knows how to hand the traffic off to your ASP.NET Core application
You may have noticed that when we published the code to a particular folder, a web.config was created in which you can see aspNetCore under Handler section as below. This is only used when deploying your application to IIS and It registers the AspNetCoreModule as an HTTP handler.
<?xml version="1.0" encoding="utf-8"?>
<configuration>
<system.webServer>
<handlers>
<strong><add name="aspNetCore" path="*" verb="*" modules="AspNetCoreModule" resourceType="Unspecified" /></strong>
</handlers>
<aspNetCore processPath="dotnet" arguments=".\NeelCorePublishIIIS.dll" stdoutLogEnabled="false" stdoutLogFile=".\logs\stdout" />
</system.webServer>
</configuration>
That is it.
Just load your IIS site and it should load just fine:

Now the application is hosted on IIS.
Hope it helps.

Thanks for great and easy article
LikeLiked by 1 person
You are welcome 🙂
LikeLike
Man, you saved me a lot of hours.. Official Microsoft docs can’t compare with your post!
Cheers!
LikeLike
I am so glad to know that Boncho 🙂
LikeLike
Thank you for this great article, saved loads of my time.
LikeLike
Glad to know that it is useful.
LikeLike
Wonderful Article, got my Core site up and running in no time
LikeLike
Thanks and glad to know that it is helpful.
LikeLike
All I got was ……..
This page isn’t working
If the problem continues, contact the site owner.
HTTP ERROR 401
LikeLike
Hi, where exactly are you getting this error?
LikeLike
Hello, may you give more details on this? In which step you are getting this error?
LikeLike
I’m having problems configuring my second Core site. I followed all the steps, except I set the port to be 8085. I can browse the new site locally, but when I try to access from a workstation I get a 404. Any ideas concerning what is wrong? URL: http://servername:8085/Home/Index.
Thanks in advance.
LikeLike
Hello Mark, 404 means not found. Are you sure you have configured everything correctly? Is your controller throwing any errors? Have a look here: https://stackoverflow.com/questions/38529123/asp-net-core-404-error-on-iis-10
LikeLike
Neel:
My bad. The port I initially chose had a web service attached to it. I changed ports and the website opened correctly. I appreciate your response.
Mark
LikeLike
Good to know that Mark.
LikeLike
May we replace…
net stop was /y
net start w3svc
By…
iisreset /restart
?
LikeLike
Hello, both does slightly different work. Have a look here: https://forums.iis.net/t/1169586.aspx
LikeLike
Hi Neel, do you know whether any version of aspnetcore module can support any version of asp.net core ?
LikeLike
Hey, I am not 100% sure on this, Have you tried and failed? It is always preferable to use the correct version though.
LikeLike
Really good and easy way to explain! I follow all your post and they always help me!
LikeLike
Thanks a lot Alexandra. Comment like this motivates me to share more 🙂
LikeLike
Neel is the same process for Web API using .NET CORE 2? Thanks!
LikeLike
Hey, yes it should help to host web api as well.
LikeLike
Neel, can I avoid using the port number? what if I want to use https://<someremoteserver/NeelPublishCoreIIIS? thanks!
LikeLike
Hey, I did not get your question. We require ports to host.
LikeLike
I simply wanted to thank you so much again. Thanks for sharing this valuable information.Net Core application to IIS: Step by step guide.
I hope you will keep sharing more such informative articles.
I would like to know more about ASP.NET CORE PITFALLS. Can you share info plz
LikeLike
So AspNetCoreModule didn’t get installed with SDK 2.1.403 for me. https://stackoverflow.com/questions/45722081/aspnetcoremodule-not-installed-with-net-core-sdk
LikeLike
It might’ve required a reboot for me. Restarting IIS svc multiple times didn’t help, but after reboot I finally saw the component registered in IIS as well as web.config created. Thanks!
LikeLike
Only you have mentioned a restart of server/system and that is the key. I was struggling from a week and at end when saw your blog and just restarted server as that was only thing I haven’t done. And Voila!! Thanku sooo much!
LikeLiked by 1 person
Thank you so much! Yes, you are right, to run .net Core, we need to run it to no Managed Code. Previously, I always receive 502 error when deploying .net core on Asphostportal server. And finally found this simple issue. Great!
LikeLike